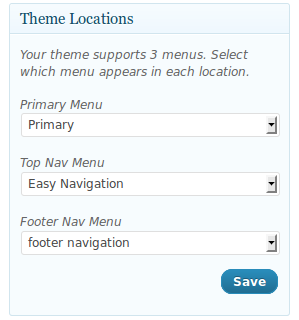
 This post is basically a prelim to our upcoming post on programmatically customizing the behaviour and output of WordPress 3 Nav menus. Of course, before we actually customize it, we need to know what it is and how the Nav Menu API works. Consider it as a quick start guide on WordPress Nav menu. So, enough of introduction, let’s get to the business.
#1: WP Nav menu from front end:
From frontend, WordPress Nav menu is a beautiful system for creating custom hierarchical horizontal and/or vertical nav menus. Now a days, all the themes have WP Nav menu enabled by default. So, simply go to the Appearance > Menus and start creating your menus from there. It is a nice work of UI designing I must say. You simply add in items, drag and position them, move one item under another and bingo. After that, all you need to do is set the menu for some predefined nav area and you are done. If your theme supports it, it should style up automatically giving you the finest control of your navigation bar.
#2: WP Nav API from the backend:
Now comes the real part. We have been saying, “if your theme supports…this….”, “if your theme supports….that….”, let us see how do we support this from the backend (the code of the theme).
#2.1: Understanding the API:
The API for registering nav menu is, indeed, register_nav_menus, and the format is:
register_nav_menus(array(
    'nav_menu_key' => 'Nav Menu Nice Name',
    'nav_menu_key2' => 'Nav Menu Nice Name 2',
));
Of course, you can add as many instances of nav menu you wish through the array. Basically each of the items will provide a unique entry under the Theme Location of Appearance > Menu.
The call of the function must be made during the init. So, in practice, we shall hook the call using the add_action API to the init.
function my_theme_register_menu() {
    register_nav_menus(array(
        'nav_menu_key' => 'Nav Menu Nice Name',
        'nav_menu_key2' => 'Nav Menu Nice Name 2',
    ));
}
add_action('init', 'my_theme_register_menu');
So, the following code will add the following three sections to the admin area.
function my_theme_three_navs() {
    register_nav_menus(array(
        'primary' => 'Primary Menu',
        'top' => 'Top Nav Menu',
        'bottom' => 'Footer Nav Menu',
    ));
}
add_action('init', 'my_theme_three_navs');
#2.2: Printing the Nav menu in the theme:
So, you’ve added the navigation menu to the admin frontend, your theme user has made some nice navigation menu and added it to the theme section as you have provided. Now, it is time to get that nav menu and show it in the theme frontend. For that we will be using wp_nav_menu API. You can read more about it here or in our upcoming post on WP Nav Menu customization. Till then, we will just focus on printing the default nav_menu with default fallback. The parameter theme_location must be the key of your Nav menu you have set using register_nav_menus.
wp_nav_menu(array(
    'theme_location' => 'nav_menu_key',
    'container_class' => 'my-nav'
));
Calling it in files like header.php would produce HTML similar to this:
<div id="nav_menu_key" class="my-nav">
    <ul class="menu">
        <li class="home current_page_item"><a href="http://localhost/wp">Home</a></li>
        <li class="page_item page-item-2"><a href="http://localhost/wp/sample-page/">Sample Page</a></li>
    </ul>
</div>
So, style up using your favorite CSS editor (I prefer NetBeans of course) and make a good nav menu for this HTML markup. You can check our vertical dropdown menu and use it as a startup. So, that is all for today. Tomorrow, we shall see how we can extend the features of the WordPress Nav menu.


Pingback: Write wp_nav_menu fallback function to list custom categories & pages
Pingback: Add home & search items directly in WordPress navigation using filters