- Introduction to VVV based WordPress Development
- Installing Needed Software to run VVV on Windows
- Installing Varying Vagrants Vagrant on Windows 10 64bit
- NFS based file sharing for Varying Vagrant under Windows
Now it is time to install VVV to know for real what this is all about. Before we jump into that, here are a few pre-requisites.
Install GIT for Windows
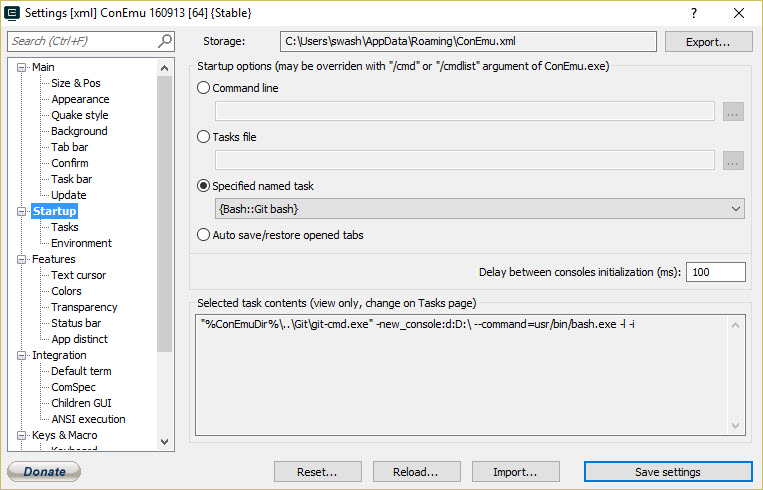
I prefer using the git-scm over github for Windows. It gives me a bash which I can use with terminal emulator like ConEmu.
- Download and install GIT for Windows. When asked, add the GIT executable to your environment
PATHvariable. - Download ConEmu and configure to use GIT bash.
- Just go to Settings (right click on the title bar) > Startup and select {Bash::Git bash}. This option will appear if you have GIT for Windows pre-installed.
PS: Haven’t used GIT before? You should.
BIOS Tweaks for installing VirtualBox on a 64bit host machine
There is an issue with modern Intel 64bit processors which wouldn’t let VirtualBox have 64bit guest OSes running under our 64bit Windows 10 OS. The fix is very simple though.
- Go to your motherboard BIOS during boot.
- Make sure Intel Virtualization Technology and VT-d are both enabled. This is very important.
- If you are on Windows 10 Pro or Server, then remove Hyper-V.
Install VirtualBox
- Download and install VirtualBox (5.1 at the time of writing).
- Make sure VirtualBox is accepting 64bit guest OSes by checking the settings. If not, then make sure you haven’t missed the BIOS tweaks.
Install Vagrant
- Download and install Vagrant by HashiCorp. Use the relevant version, for my config it was Windows 64bit.
- Open up ConEmu and type
vagrant version. If everything is fine, then it should give you an output like this.

That was all about the required software to run VVV. Next in this series, we will see how to install varying vagrants vagrant using GIT and run our very first site.
