- Securing your Ubuntu VPS and Creating Users – Ubuntu VPS Setup # Part1
- Install Apache with Virtual Host Concept on Ubuntu VPS
- Installing PHP and suPHP on Ubuntu VPS
- Installing MySQL and PHPMyAdmin on Ubuntu VPS
- Install FTP Server (ProFTPD) on Ubuntu VPS
- Fully Automated SSL with Let’s Encrypt, Apache & WordPress
Quoting directly from the source
Let’s Encrypt is a free, automated and open Certificate authority.
It is very useful and kind of necessary to add SSL on your websites. But purchasing and maintaining SSL can be quite tedious. Luckily we now have Let’s Encrypt, using which we can get free SSL certificates and enable auto renew features. In this guide we will see how we can setup Let’s Encrypt SSL on Apache based debian (Ubuntu etc) server.
Prerequisites:
Accessing Your Server
I have already covered in-depth on how to access your server and act as super user in this series. Please follow up the rest of this guide if you are unsure. For those who just wants the commands
ssh user@server.com -p [SSH PORT]
Enter password when being prompt. Then escalate priviledge by
sudo su
You might need to type in your password again.
Install Let’s Encrypt Client
Let’s Encrypt has a nice debian client for automating most of the process like
- Generating SSL certificate for a domain.
- Renewing SSL certificates for existing domains.
Install Git
To get started we need to have git on your server.
apt-get update && apt-get upgrade
The command above would upgrade all your existing apps. Now to install git
apt-get install git
Git is a version control system. We will not discuss much about it, but I do it all the time for development of all my products.
Clone Let’s Encrypt Repository
We will be cloning (copying) Let’s Encrypt repo in the /opt/letsencrypt/ directory.
git clone https://github.com/letsencrypt/letsencrypt /opt/letsencrypt
Now navigate to the directory
cd /opt/letsencrypt
We are ready to generate certificates.
Generating Certificates
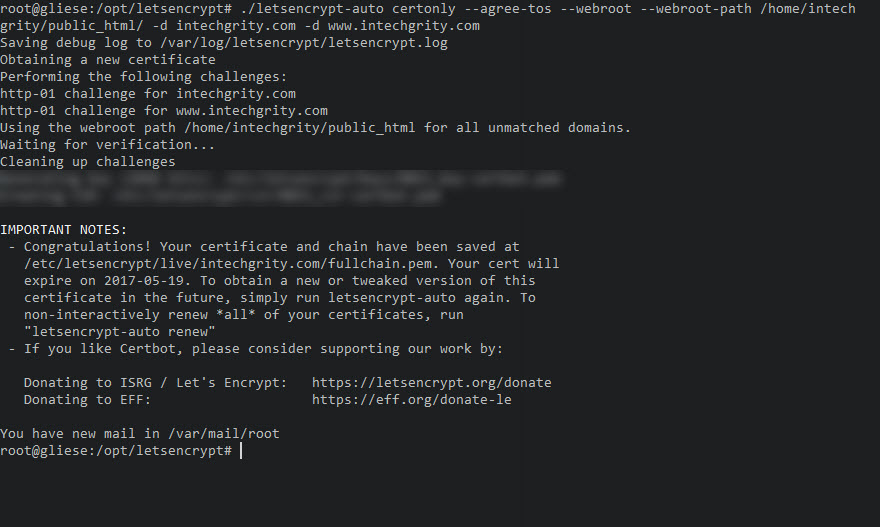
To generate a certificate, say for example our website intechgrity.com, we need to run the following command from the directory above.
./letsencrypt-auto certonly --agree-tos --webroot --webroot-path /home/intechgrity/public_html/ -d intechgrity.com -d www.intechgrity.com
This will create SSL certificate in the directory /etc/letsencrypt/live/intechgrity.com/.
You can navigate to the directory and see the certificates yourself.
Adding Certificate to Apache
Here you have two options.
- Use HTTPS port only to open your site. The non https (http) site would simply stop loading. I do not like this.
- Use https and http configuration and use WordPress Plugin to redirect non https to https domain.
I am going to discuss method 2.
Enable SSL Module
a2enmod ssl
Copy over the existing Virtual Host
Your domain is setup in Apache virtual host. I am talking about Apache 2.4 here since 2.2 is long deprecated. First navigate to:
cd /etc/apache2/sites-available
Now copy over the existing site configuration.
cp intechgrity.conf intechgrity-ssl.conf
Set SSL Location in Apache Config
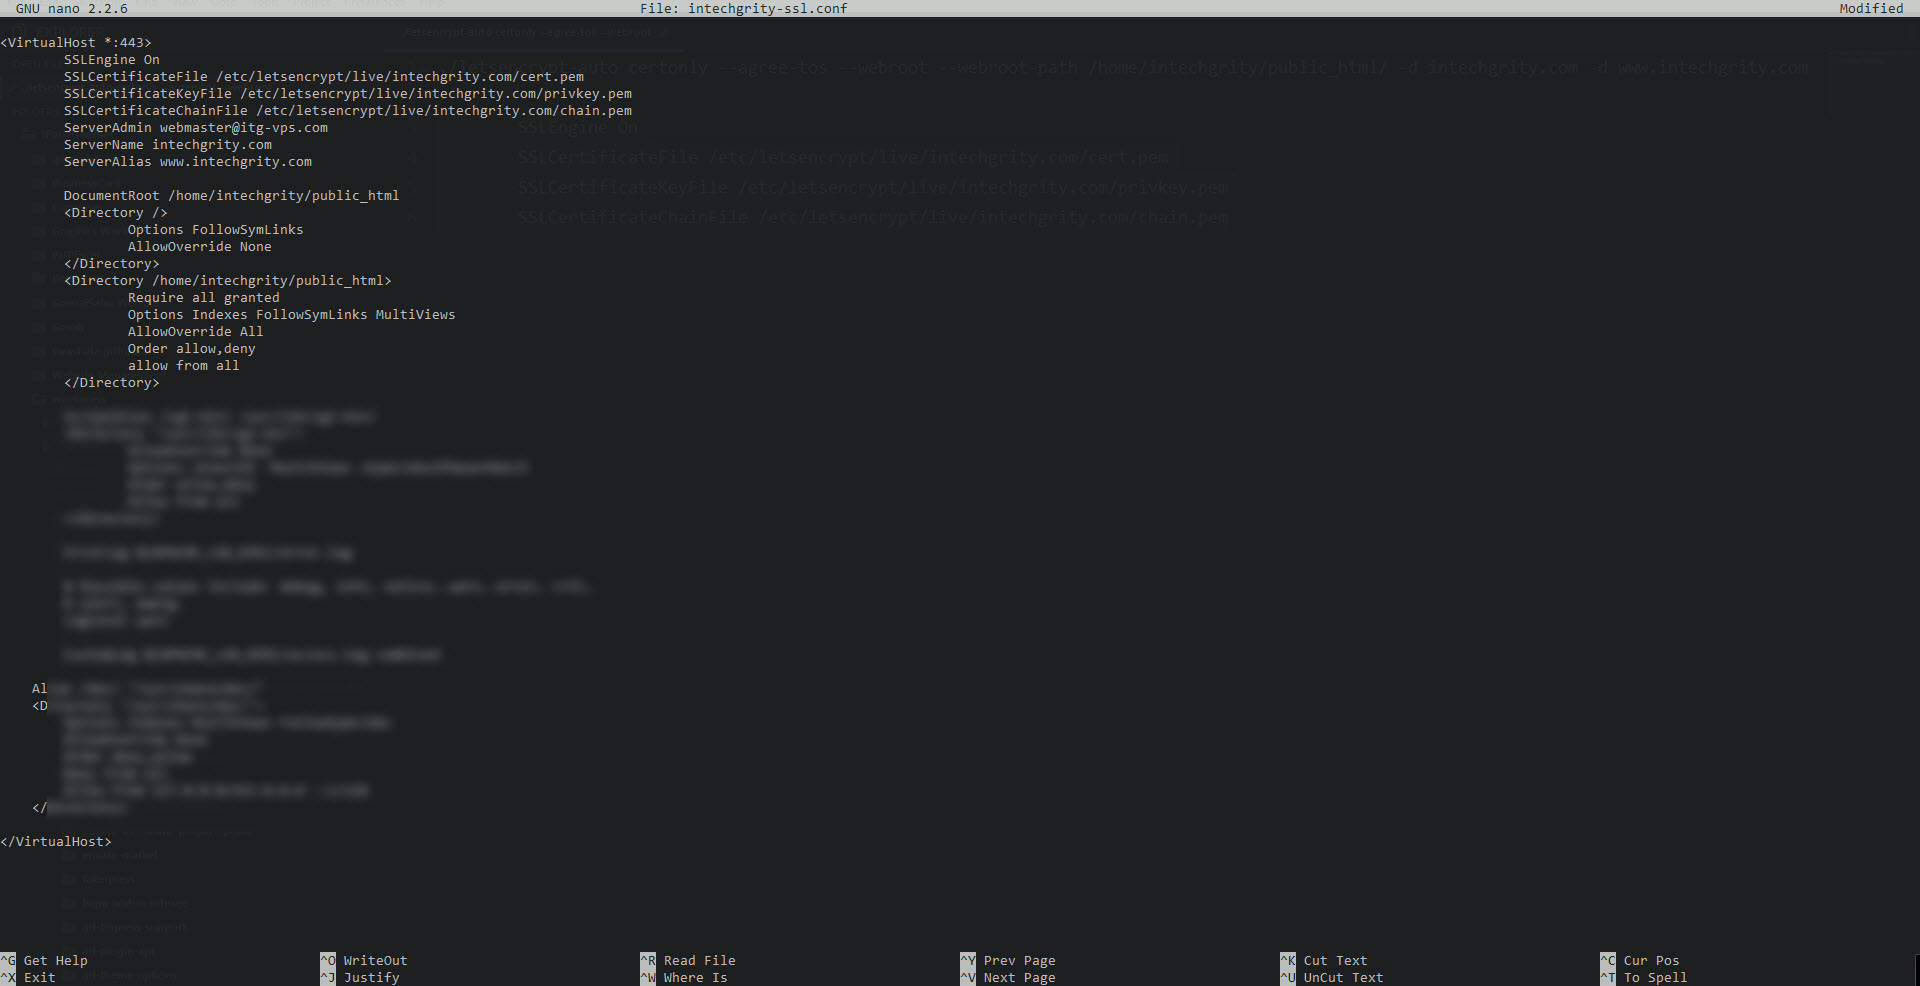
Now edit the newly created configuration.
nano intechgrity-ssl.conf
Your SSL certificates are located inside the directory /etc/letsencrypt/live/domain.com.
So in case of intechgrity, it was inside /etc/letsencrypt/live/intechgrity.com.
Inside the intechgrity-ssl.conf file, I modify to match the following settings.
<VirtualHost *:443>
        SSLEngine On
        SSLCertificateFile /etc/letsencrypt/live/intechgrity.com/cert.pem
        SSLCertificateKeyFile /etc/letsencrypt/live/intechgrity.com/privkey.pem
        SSLCertificateChainFile /etc/letsencrypt/live/intechgrity.com/chain.pem
        ServerAdmin webmaster@itg-vps.com
        ServerName intechgrity.com
        ServerAlias www.intechgrity.com

        DocumentRoot /home/intechgrity/public_html
        <Directory />
                Options FollowSymLinks
                AllowOverride None
        </Directory>
        <Directory /home/intechgrity/public_html>
                Require all granted
                Options Indexes FollowSymLinks MultiViews
                AllowOverride All
                Order allow,deny
                allow from all
        </Directory>
</VirtualHost>
The port was changed to 443 and we turned on the SSL engine. We also add in our SSL config files.
        SSLEngine On
        SSLCertificateFile /etc/letsencrypt/live/intechgrity.com/cert.pem
        SSLCertificateKeyFile /etc/letsencrypt/live/intechgrity.com/privkey.pem
        SSLCertificateChainFile /etc/letsencrypt/live/intechgrity.com/chain.pem
Now we save Ctrl+O and exit Ctrl+X nano.
Enable SSL Site
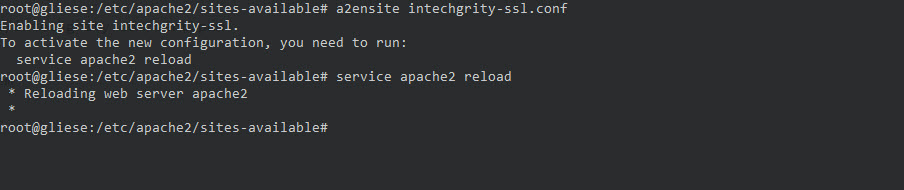
We tell apache to enable the new ssl site.
a2ensite intechgrity-ssl.conf
And reload configuration.
service apache2 reload
At this point https://intechgrity.com is also accessible.
PS: If you are doing this live and are getting logged out from WordPress, then simply access your /wp-admin/ from SSL, like https://example.com/wp-admin/.
Tell WordPress to use SSL
For this we are going to use Really Simple SSL plugin. Just search the plugin and activate from admin dashboard.
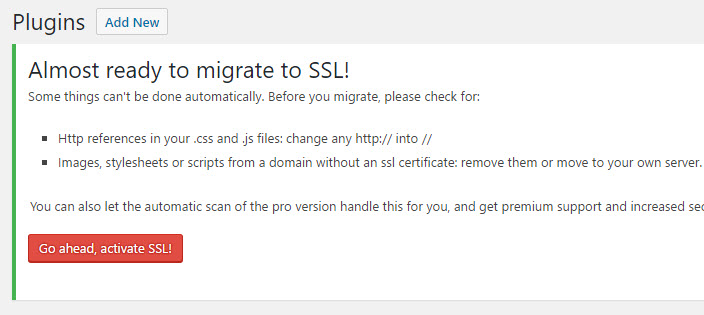
That was all. You should thank to plugin author RogierLankhorst.
Automate Let’s Encrypt Renewal
Let’s Encrypt certificates last for 3 months. After that you need to renew. Don’t worry this process can be automated with the help of crontab.
Let’s edit the root user’s crontab.
crontab -e
Put the following line at the end of the file
0 0 1 * * /opt/letsencrypt/letsencrypt-auto certonly --agree-tos --webroot --webroot-path /home/intechgrity/public_html -d intechgrity.com -d www.intechgrity.com --renew-by-default >> /var/log/letsencrypt/intechgrity-renew.log && service apache2 reload
and save. It basically tells to renew certificate every month and save the log at /var/log/letsencrypt/intechgrity-renew.log file. Once done, it reloads apache to take effect.
That was all. Now enjoy life time free SSL certificate and all the security that comes with it. Thank you Let’s Encrypt.
